Tips on At-Home Assisted Stretch

Improve Your Flexibility With These Yoga Poses

by Molly Rausch L1 Personal Trainer and Certified Athletic Trainer

Hello everyone! This week’s “Fitness Tip of the Week” is about how to supplement assisted stretch sessions while at home. We all know how important movement is in our day-to-day. We work hard to get our strength and cardio workouts in, but we can’t forget how important flexibility training is. For a lot of us, the amount of movement we do in our day-to-day has significantly reduced. I don’t know about any of you, but my back and hips have been feeling exceptionally stiff from the increase in sitting time. It’s a lot harder to help our bodies feel better, when resources like massage therapy, assisted stretching, or manual therapies aren’t currently available for a majority. Static and dynamic stretching is a good way to help with mobility and flexibility improvements, but sometimes passive stretching with some extra assistance is exactly what the body needs.

Tips on Equipment

Before I get into the equipment part, I wanted to share one note on stretching. When you are doing passive stretching either alone or with someone assisting you, you always want to try and keep the body as relaxed as possible. I know this is easier said than done, but the more you can relax into a stretch, the more you can get out of it.

Now onto the equipment part! There are a lot of items both online you can purchase or that most of us have at home already that can help assist your passive stretching. Online equipment includes everything from foam rollers, yoga or stretching straps, super bands, stretch rings, leg stretching device, back stretcher equipment, and on, and on. You really don’t need to get that fancy though. To get a well-rounded, full body, stretch session done at home, you really only need a wall, towel, bed or couch, and a rolled up blanket.

From Your Head to Your Toes

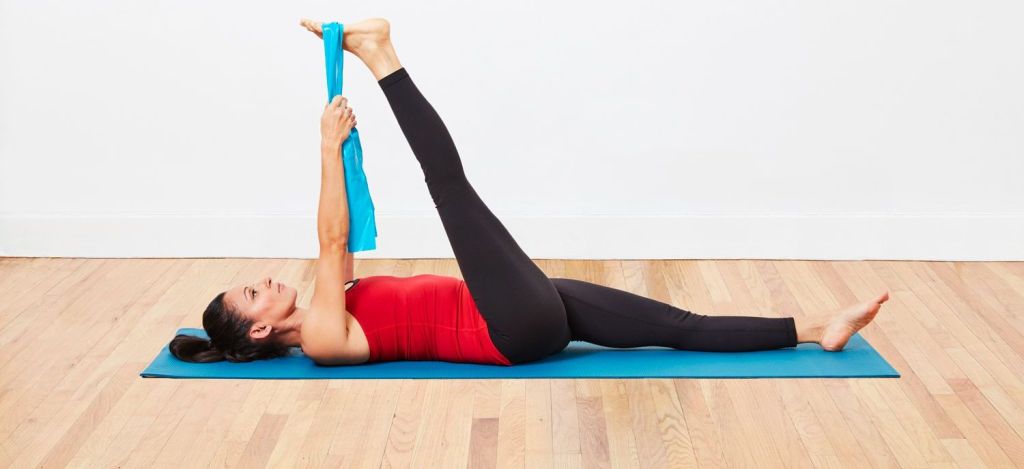
Below I have provided a great, full body, stretch routine to get the body unbound and moving better. Hold each stretch for one or two minutes. Anything shown with a bench or table can be done on a couch or bed. The neck stretch can be performed done sitting on a chair or the ground. Set a timer, perform stretch on both left and right sides, and remember to relax as best you can! Last tip: don’t push it too much. There should be a mild stretching sensation, but no pain!

Neck Stretch
Shoulder Stretch
Pectoral Stretch
Lat/Back Stretch
Top Five Thoracic Mobility Drills to Improve Your Overhead ...
Hip Flexor Stretch

Quad Stretch


Hamstring Stretch

Groin Stretch
Calf Stretch

If you have any questions on this topic, please feel free to contact me at mrausch@healthworksfitness.com or leave a comment below!

Tips on Working Out with Household Items

Stuck at home? Work out with these household items that can double ...

by Molly Rausch L1 Certified Personal Trainer and Certified Athletic Trainer

Hello everyone! This week’s “Fitness tip of the Week” is about getting creative with your workout using household items. Our world has been completely turned upside down. Routines are altered, gyms are closed, and we all have had to adjust everything in a matter of days. It’s hard enough staying on track and motivated with our fitness goals when we have full access to everything we need. Being stuck at home and having many of the resources stripped away adds an additional challenge to fitness. A lot of us don’t have extra money to buy all the equipment we need. Even if you could purchase gym equipment to stock up your home gym, many online stores are having shortages or delays. Luckily in this digital age, a lot of fitness professionals are willingly sharing tons of information on how to do small space, no equipment workouts to help people stay active and sane. Even just googling “at home workouts” produces literal thousands of websites and pictures on generalized workouts for you to do.

Just because the gym is taken away, doesn’t mean you need to switch your fitness goals or completely change your entire program. Your home has a lot of hidden treasures that can serve a double purpose. Talking with my clients, the biggest hurdle has been figuring out how to keep their strength up. How do you strength train when you have no weights? I want to share tips on items around your home that can help you.

Indoor Household Items

You have plenty of items within your home that can provide plenty of weight. The actual weight you are using will vary, so the best way to know how much you are lifting is by weighing it yourself. If you don’t have a kitchen scale, the “package shipping weight” trick is a good way to see exactly how heavy your household items are. If you weigh yourself, then reweigh yourself holding the item, the difference in weight will be your item’s weight. Just remember: SAFETY IS KEY!

  • Milk Carton, Water Jug, and Laundry Detergent Jug
    • These items are very popular for demonstrations online. Depending on the size, they can weigh anywhere from 5 pounds to 25 pounds (if you get a 3 gallon jug). These are great substitutes for dumbbells or kettlebells.
  • Soup or Vegetable Cans
    • These will provide you with a pound or so of extra weight. Great for upper body work or any long, isometric holds or pulsing exercises.
  • Buckets, Backpacks, and Laundry Baskets
    • These items you can fill with anything from sand, rocks, books, or shoes to add more weight. You can perform bench press, squats, lunges, and deadlifts with these heavier items.
  • Flour, Rice, and Sugar Bags
    • Place the bags in a ziplock or plastic bag to reduce mess. These will provide you with lighter to medium weight if you get standard sizes. They are great dumbbell or sandbag replacements.
  • Towels or Paper Plates
    • You can use these items for any slider exercises you would do in the gym. It increases stability and control through any strength movement.
  • Broom and Mop Handles
    • You can use these for exercises that require dowel or a barbell. Dowel exercise like hollow holds, hinge hinges, or birddogs can all easily be done with a broom or mop. To use as a barbell, you can hang an equal weighted bucket or backpack on either end, tape it in place so it’s secure, and lift away.
  • Rope
    • You can tie knots on either end, loop around something anchored and solid (i.e. tree branch) and use for a TRX replacement. You can do inverted rows, assisted squats, standing hip drops, etc.
ghetto gym

Using Your Environment

It’s not just containers you can use to help assist your home workouts. There are plenty of items within your environment that can assist you. If you desperately want to get out of your house, there are plenty of items to help you get a great workout.

  • Stairs or Benches
    • Using stairs or benches within your environment are great items for cardio or strength exercises. Step ups, triceps dips, elevated push ups, and decline push ups are all examples of movements using just a bench or stair.
  • Rocks
    • It may seem silly, but a big rock is great for strength building. Just the core control and grip strength to get it to your shoulders to do an offset squat will wear you out.
  • Old Tires
    • I am aware not everyone has an old tractor tire to just flip over or hit with a sledgehammer. If you do, fantastic. If you don’t have a tractor tires, but do have a spare car tire, use it to your advantage. It would be a great piece of equipment to do weighted or BOSU burpees with!

If you are stuck inside and have no safe outdoor area to workout in, I wanted to also provide a list of items within your home to use to complete those workouts.

  • Couch or Chairs
    • Great for box squats, single-leg sit to stand, rear-foot elevated split squats, or several different elevated or decline exercises.
  • Cushions or Bed
    • Taking the cushions off the couch or a chair is a great substitute for a foam pad or BOSU ball. The bed can be used as an unstable surface to help with balance and stability.
  • Wall
    • Don’t forget to do those wall sits for isometric strength building! Find any solid wall and start that timer! Walls are also great tools to work on inverted exercises, like handstands.
  • Children
    • Need to multitask? Use your children to increase your exercise difficulty! Piggy back walking lunges or squats, weighted plank, or bear crawls with a passenger are fun and challenging!

If you have any questions on this topic, please feel free to contact me at mrausch@healthworksfitness.com or leave a comment below!

BOSU Workout Tips

by Molly Rausch L1 Certified Personal Trainer and Certified Athletic Trainer

Hello everyone! This week’s “Fitness Tip of the Week” is what, why, and how to use the BOSU Ball. Now, some of you may have already used this piece of equipment and others may have no idea how to even start. That’s okay! 

For those of you not sure, the BOSU ball is the half fitness ball and half flat surface piece of equipment. And I know the name seems odd, but it’s actually an acronym for how to use it! BOSU stands for BOth Sides Up. You can do exercises on either side to get a nice variety in your workout. Incorporating the BOSU into a fitness routine is great to help improve balance and stability. It’s beneficial for everyone from athletes to the active aging to the injured. Training full body on unstable surfaces helps improve your body’s awareness in space and general full body stability. 

BOSU Full Body Workout:

Below is a great full-body, HIIT style workout with 10 exercises using only the BOSU ball.

Compete all the exercises in the first column, then move to the second column.

Complete as many reps as possible in 30 seconds.

Give yourself 15 seconds rest between each exercise.

Complete 4 rounds!


Squat
Knee Tucks
Mountain ClimbersSide Shuffle
BridgesPush-ups
Side PlankBurpees
Lunges10. Bent Over Rows

If you have any questions on this topic, please feel free to contact me at mrausch@healthworksfitness.com or leave a comment below!

Proper Push-up Form

by Molly Rausch L1 Certified Personal Trainer and Certified Athletic Trainer

Hello everyone! This week’s “Fitness Tip of the Week” is on proper push-up form. This is a great strength move to incorporate into your fitness routine. A hard move, but a great move. 

Why are they so challenging? At the surface level, it is a great, equipment-free exercise that helps build upper body strength. If you dive deeper, the push-up is great for strengthening your back and core as well. They are hard because it requires a lot of muscle strength. When one push-up technique starts to get easier, changing your hand, elbow, or foot position keeps the progress going.

Tips on Proper Form

  1. Feet: Flexed and perpendicular to the floor and spaced no wider than hip width apart.
  1. Knees: Should be straight with no sag UNLESS you are performing a push-up on your knees.
  1. Hips: No sagging or tilting. 
  1. Back: Should remain straight. Do not let the low back sag down to the ground.
  1. Core: Remain engaged to stabilize trunk.
  1. Shoulders: Pulled back and away from your ears. No excessive sagging or rounding.
  1. Head: Should remain inline with your spine. Chin should be tuck. Do not let your head sag toward the ground .

If you have any questions on this topic, please feel free to contact me at mrausch@healthworksfitness.com or leave a comment below!

Getting Over Plateaus

by Molly Rausch L1 Certified Personal Trainer and Certified Athletic Trainer

Hello everyone! This week’s “Fitness Tip of the Week” addressed ways to get over fitness plateaus. Whether you are a new gym goers, fitness fanatics, or elite athletes, we are all susceptible to experiencing stalls in our training. We find classes we like, routines that work, and find our fitness rhythm. We have a plan and we are doing well with following it. Everything is going so well, until….

Boom! Plateau! InBody assessments stop improving or one rep maximums don’t increase. Frustration sets in. A lot of us become disheartened and our motivation waivers. The most frustrating part about plateaus is knowing there is a reason they happen. 

Why Plateaus Happen 

The human body has many amazing capabilities. One of those includes the body’s ability to adapt to the stresses placed on it. Our body learns to adapt so it doesn’t break. It doesn’t just keep adapting regardless though. If it gets used to the same type of stress, the body gets in a new comfort zone. When you build a workout program but fail to progress or mix it up enough, your body will adjust to that level and settle in. 

Tips on Getting Over Plateaus

  1. Get some R&R: sometimes the body just needs a little rest to repair and rebuild. It may sound counterintuitive, but it sometimes acts as a reset button to get everything jump started again.
  2. Change your sets and repetitions: if you are lifting and only every doing 3 sets by 10 reps, you are going to plateau quickly. You need to switch up how much of everything you do so the body keeps getting challenged in different ways.
  3. Try something new: Every now and again, mix in a new class or fitness workout to your program to keep the body guessing.
  4. Talk with a trainer! If you are having trouble trying to figure out what to do, ask a profession for guidance. We are here to help and want to see everyone succeed! 
  5. Look outside the gym: maybe your gym routine is solid, but there is something else attributing to the plateau. A reflection of diet, sleep, or general life may be a bigger reason for a stale in progress.

If you have any questions on this topic, please feel free to contact me at mrausch@healthworksfitness.com or leave a comment below

Tips on Rowing Form

by Molly Rausch L1 Certified Personal Trainer and Certified Athletic Trainer

Hello everyone! This week’s “Fitness Tip of the Week” is about the ergometer, better known as the “rowing machine.” If used correctly, the erg can be a great full-body, cardio workout! The erg is a great machine to use whether you are trying to introduce cardio to your routine, reduce impact from your current exercise program, or find a great cross training exercise. A lot of people are more comfortable getting on the treadmill or bike to check their cardio off for the day, but don’t let unfamiliarity with rowing keep you from choosing it as a great cardio workout. Whether you have a HIIT workout on your agenda or looking to build endurance, the erg is ready and waiting.

Proper Technique 

For this week’s tip, let’s break down the parts of proper rowing form and then go over how to improve it. There are really only two things you may need to adjust when you sit at an erg: the strap for your feet and the resistance. The strap should be at the level of your laces, but not pass your arches. So you are sitting at the erg, with your feet strapped in, now what? You begin the “catch” phase of the rowing form. Catch is simply when you bend forward to grab the handle. Back should be straight, hinge at your hips, and keep your core engaged. From there you will begin the drive, lean, pull portion of the rowing form. During this phase, drive your legs back until they are almost straight, hinge at your hips and lean your torso backward. Once your torso is about 90 degrees, then you begin to pulling with your arms. The finished position is when your legs are straight, arms bend, torso leaning back, and the handle is at your lower chest.

Tips on Improving Your Rowing

  1. Grip: Remember not to grip too hard when you row. You shouldn’t be wearing out your forearms or tearing up your hands while you are rowing.
  2. Drive back: you should be driving yourself back, not lifting or pressing up. You shouldn’t feel yourself lift off the seat or come off it while you row. 
  3. Give your arms a break: Your legs contain your strongest muscles, so let them do the work. Remember your legs should move first and then pull with your arms.
  4. Relax the shoulders: remember to keep your shoulders relaxed and to pull to your lower chest. You should not be pulling up toward your neck.
  5. Keep your back straight: proper rowing form means you are hinging at your hips, not bending at your back. Your back should stay straight with your core engaged at all times.

If you have any questions on this topic, please feel free to contact me at mrausch@healthworksfitness.com or leave a comment below!

Proper Lunge Form

Learn how to lunge: Correct form & benefits - FitnessGenes®

by Molly Rausch L1 Certified Personal Trainer and Certified Athletic Trainer

Hello everyone! This week’s “Fitness Tip of the Week” is about lunge form. Static lunge, side lunge, walking lunges, curtsy lunge, jumping lunge, etc, etc. There are so many variations to the lunge to help get you strong and increase stability in multiple planes of motion. 

When done properly, the lunge is a very effective exercise for many different reasons. It is great for strengthening your quads, glutes, and calves. It helps improve balance through both static and dynamic stabilization. It also can be used to get that heart rate up during cardio workouts. 

Why form is important

It wouldn’t  be a “Fitness Tip of the Week”  if I didn’t throw in some injury prevention information. Similarly to the squat, the lunge is  a complex movement. What this means is there’s a lot of joints to be aware of. If the lunge is done incorrectly, you can sustain injuries to your knees or low back. If you don’t pay attention to knee position, all the stress from the movement transfers to the knee instead of staying in the quads. If you don’t support your upper body by engaging your core, your mid and low back will take the stress. 

Tips on Forward Lunge Form

  1. Head: chin should be up 
  2. Shoulders: Pulled back and away from your ears
  3. Core: engaged, with chest tall and back flat
  4. Torso: shoulders, hips, and head should all stay in line with each other
  5. Back leg
    • Heel should be facing up toward the sky
    • Knee should be bent to 90 degrees
    • Knee should stay a few inches off the ground
  6. Front leg 
    • Toes facing forward with most of the weight in front foot
    • Knee should stay behind toes
    • Knee should be bent to 90 degrees

If you have any questions on this topic, please feel free to contact me at mrausch@healthworksfitness.com or comment below!

Tips on Improving Your Sleep

by Molly Rausch L1 Certified Personal Trainer and Certified Athletic Trainer

Hello everyone! This week’s “Fitness Tip of the Week” is about sleeping! We work so hard, day after day, to make progress towards our fitness goals. We make a fitness plan, hire trainers, and consult nutritionists in an effort to get the results we desire. We work so hard while we are awake, but all that effort gets wasted if you don’t give your body the sleep it needs. Sleeping is your body’s time to recharge, rebuild, and repair. If you don’t get enough sleep or are chronically lacking sleep, your physical and mental performance both suffer! I know how hard it can be to prioritize sleep, but any fitness goal you have suffers without it. 

Sleeping 101

Adults need between 7 and 10 hours of sleep every night. If you skip out and get less than 8 hours, you increase your risk of injury by 1.7 times. If you try and get by with less than 6 hours of sleep, you are FOUR TIMES more likely to get sick. Your reaction time slows and motor function becomes impaired equal to that of an intoxicated person. 

So what happens if you have one or two late nights and skip a couple hours of sleep? To put it simply, you accumulate “sleep debt” that you need to pay back. What does this mean? If you need a minimum of 7 hours a sleep per night and on Saturday night you end up only getting 4 hours a sleep, Sunday night you need to sleep for 10 hours to “pay back” your sleep debt from the night before. Do that a couple days each week and you can see how the sleep you need increases. 

Tips on Improving Your Sleep

  1. Stick to a routine
    • Just like you plan your workouts, you need to plan your sleep. I know it’s not always controllable, but when possible, wake up and go to sleep around the same time every night. Develop a bedtime routine so your body knows when it’s time for sleep
  2. Bedroom=Sleep
    • Your bedroom should serve as your relaxation room, not your multipurpose room. By using your bedroom mainly for sleeping, your brain will then associate your bedroom with sleep. Keep it cool (between 65-67 degrees fahrenheit). Reduce light and noise pollution.
  3. Reduce alcohol and caffeine consumption
    • Although you may fall asleep faster with alcohol, it disrupts your sleep cycle. You get less of that deep sleep that you need to really help your body recover.
  4. Avoid that blue light
    • Cell Phones and TV’s give off blue light, which keeps our body alter and active. Turning off electronics anywhere from 30 minute to 2 hours before bedtime is recommended to help you body prep for a good night’s rest.
  5. Avoid naps
    • If you are truly tired, then sleep. If you don’t really need a nap though, try to avoid it so you keep to you normal sleep routine. 

If you have any questions on this topic, please feel free to contact me at mrausch@healthworksfitness.com or leave a comment below!

Proper Plank Form

by Molly Rausch L1 Certified Personal Trainer and Certified Athletic Trainer

Hello everyone! This week’s “Fitness Tip of the Week” is about proper plank form! Upright plank, side plank, forearm plank, plank shoulder taps, etc, etc. There are so many plank variations and they are all so great for strengthening your core! Planks are hard and they should always be hard, especially if you keep doing them the right way. It’s a whole body workout that will leave every muscle shaking until that timer goes off.

Why is everyone always planking? First, it’s a great full body exercise. You use your arms to hold you up. Your serratus anterior muscles are used push your shoulders forward and keep your mid back from sinking down. Your whole core is holding your trunk off the ground and keeping your back straight. Your glutes help keep those hips where they belong. Your quads keep your legs straight. Your tibialis anterior keeps those feet flexed.

Second, it strengthens your core the right way. What do I mean by that? Your core is meant to stabilize your body, so you need to do a stabilizing strength move. An exercise like crunches contract one muscle group to flex your trunk forward. We work all day to avoid that position, because we want to protect our backs so why strengthen that way? Planks don’t just strengthen one muscle making up your core. You hit them all and it puts on in a better postural position. 

Tips on Plank Form

  1. Start by getting on your hands and knees in the quadruped position.
  2. Place your hand directly below your shoulders so your hands, elbows, and shoulders are all stacked on top of each other.
  3. Maintain a straight line from your head, your back, and your hips.
  4. Straighten one leg out at a time.
  5. Now that you are holding the position, step it out a notch and really get the most of out of your plank:
    • Tuck your chin down and in 
    • Push the floor away with your hand 
    • Squeeze your core tight drawing your ribs in so they don’t flare
    • Tuck your pelvis in
    • Squeeze your glutes
    • Squeeze your quads to keep your legs straight
    • Push your toes forward to maintain proper position 

If you have any questions on this topic, please feel free to contact me at mrausch@healthworksfitness.com or leave a comment below!

Static Stretching

by Molly Rausch L1 Personal Trainer and Certified Athletic Trainer

Hello everyone! This week’s “Fitness Tip of the Week” is about static stretching. Static stretching is a stretch that is held for a period of time in a challenging, but comfortable position. To restate: you shouldn’t be in pain when you stretch, but you do need to reach out for that extra inch. Generally, holding a single stretch for 20-30 seconds yields the best results. To keep the benefits gained from static stretching, it needs to be done on a regular basis, several times per week.

So let’s get into the why we need to do it and when to use it!

Why and When?

The main purpose of  static stretching is to increase flexibility. Tight muscles limit your range of motion, which then throws off your movement pattern. If you can’t move effectively through a movement pattern, you won’t be as successful and you risk injury. Take your squat for example: If you have tight hips, your squat depth will be limited and you can’t strengthen your muscles through the whole squat movement pattern. Stretching out your hips will make it easier to increase squat depth and improve the skill altogether. 

Static stretching can be done before or after activity. The big thing to remember is to not stretch “cold” muscles. Do some type of warm-up first and then stretch. It doesn’t have to be super complex. Walking on the treadmill for a few minutes, dynamic warm-up, or riding the stationary bike are all great ways to warm-up before you do static stretching. You will already move better by getting that blood pumping, which will result in getting more from the stretches themselves. 

Static Stretching Tips

  1. Stay balanced- The best way to prevent injuries is by keeping your body balanced. You want your right and left sides to match in flexibility and range of motion. 
  2. Match your stretches to your workout- You want the muscles you are going to be working hard, moving well before and after your workout, so plan your stretching accordingly. I.E. If it’s leg day, focus a majority of your stretching session on your legs!
  3. DON’T BOUNCE- Trying to bounce while holding a stretch is a HUGE INJURY RISK. Slow, controlled, and sustained is the best way to static stretch.
  4. Use it or lose it- If you don’t stick to a regular stretching routine (2-3 times every week), you are going to lose all those flexibility gains your work so hard to get. 

If you have any questions on this topic, please feel free to contact me at mrausch@healthworksfitness.com