Foam Rolling

by Molly Rausch L1 Certified Personal Trainer and Certified Athletic Trainer

Hello everyone! This week’s “Fitness Tip of the Week” is about foam rolling. A lot of people are familiar with what foam rolling is in general, or at least, what a foam roller is. The technical term for foam rolling is called “self myofascial release.” Every skeletal muscle you have is covered in tissue called fascia. Fascia helps separate and support the muscles. Sometimes, scar tissue or adhesions can form between the fascia and the muscle, which limit movement and cause flexibility decreases. Foam rolling helps break up the adhesions and scar tissue, aka “release” the fascia from the muscle. 

Now, there are a TON of foam rollers out there. Some work better on different areas of the body. Some are more padded for tender areas. Some even vibrate to help loosen up those tight muscles! The best thing to remember when selecting a foam roller to use is what is manageable for you. Foam rolling should not be so painful that you can hardly get through it without a tear to your eye. It may not be comfortable, but it shouldn’t be excruciating. 

Why:

I have touched on this a little bit already, but the whole reason for foam rolling is to help improve the quality of movement by improving flexibility. Stretching is great to help you move better, but imagine the improvements you could make by foam rolling along with stretching? You first break up all the scar tissue/adhesions to release your fascia from the muscle and then you stretch it out to really help improve your flexibility. Just like you should have a well-rounded training program, you should also have a well-rounded recovery/self-care routine.


When:

There is a lot of research and discussion on when is the BEST time to use the foam roller. People have looked at if it’s better before or after workouts and if you should stretch before or after, but it gets a lot of mixed results. People have found improvements on all arguments. You could really drive yourself crazy trying to pick a BEST time. Ultimately, the best thing is to just do it regularly. Foam rolling once here and there, no matter when you do it in respect to your workout or stretching, is not going to help give you the tissue changes to help improve flexibility and movement. If you are working your muscles regularly, they will be breaking down and rebuilding adding more adhesions between the fascia and muscle. If you use your muscles, you should also give them some love.

How:

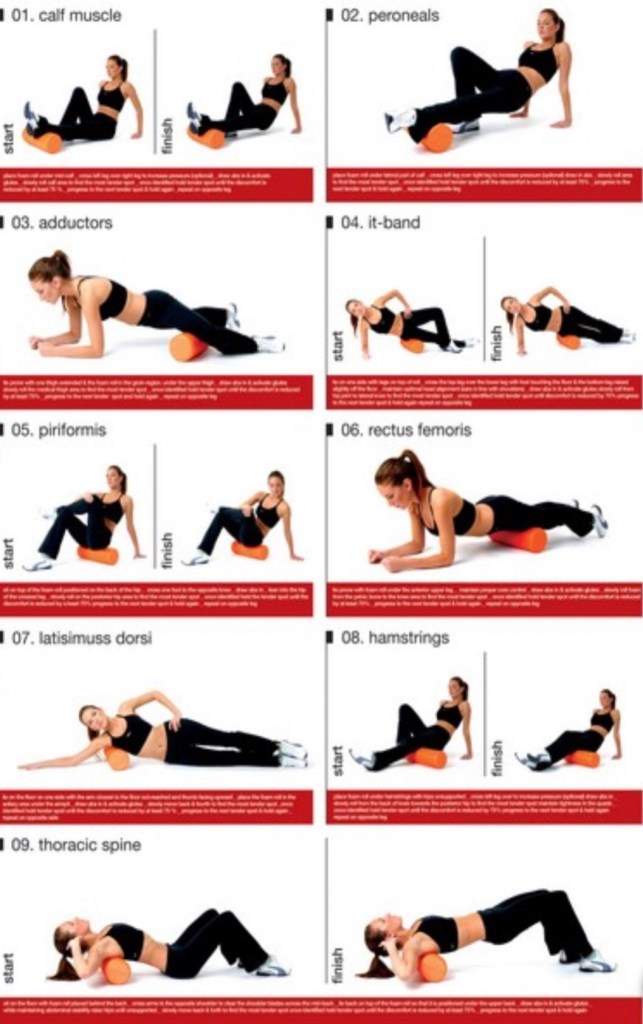
You can roll out pretty much every skeletal muscle you have, if you have the right roller. Again, what is right for you and a certain muscle group may not be the same for another. When foam rolling, give it enough time. Just like stretching, don’t rush through foam rolling. Give each muscle group a minute or so. Roll all the way up and down the muscle. Remember to breathe through it and keep muscles as relaxed as possible. If you find a spot in the muscle that is a little extra tender, keep the foam roller on that spot for a couple seconds. I have attached a document on the next page that has examples on how to roll out different body regions.

If you have any questions on this topic, please feel free to contact me at mrausch@healthworksfitness.com or comment below!

Starting a Routine

by Molly Rausch, MS ATC, CPT

Hello everyone! This week’s “Fitness Tip of the Week” is about getting into a fitness routine. Whether it’s a New Year’s resolution, special event, or just a new goal for you, starting a new fitness routine is not an easy task. It’s so hard, in fact, that most people end up giving up after only three weeks. A timeframe of weeks is not enough time to develop those new habits or to reach many of our desired goals. We all need to be patient and give ourselves more time to get into the habit of a new routine. How much more time? Well, on average, it takes a little more than 2 months for a new habit to set in.

In order to develop a new fitness habit, we need to understand the parts of a habit. The first part is what triggers the action we want, also known as the cue. When getting into a fitness routine, this can easily be time of day. Keeping your workouts at a consistent time each day helps that time of day become a cue for that new habit. The second part to a habit is the routine or action itself (actually starting your workout). The last part of a habit is the best part, the reward! This can be a feeling, seeing results, reaching the actual goal, or a combination of all three.

Tips on Starting a Fitness Routine:

Okay. You know how long it may take to make a new routine a habit and the parts of developing a habit, but how do you actually do it? How do you stay on track and stay consistent to see results? Here is a guideline on how to do that:

  • Step 1: Break it down
    • Start small with one change at a time. Your car can’t go from 0 to 80 mph instantly and neither can you. Come up with your main goal and break it down into smaller, more manageable, short-term goals. You will build in little stepping stones to take you along your journey, which will make you more successful long-term. This feeds right in to step 2…
  • Step 2: Try and associate working out with pleasure
    • Set small goals that, when you accomplish them, you reward yourself for. Maybe you get your nails done or buy a cute, new workout top. Do something for you that will make you want to keep pushing forward to succeed. Be kind to yourself. It’s okay to treat yourself for accomplishing a goal!
    • Put things into your workout routine that you enjoy doing. If you hate cardio but love dancing, do Zumba for your cardio! Find what you love and get creative with how to incorporate it into your routine.
  • Step 3: Expect Setbacks
    • The road to success is not going to be completely smooth. We have all heard the phrase “plan for the worst, hope for the best.” Stay hopeful and motivated that you will reach your goals, but plan for plateaus and setbacks. Have a plan or seek help when they happen to keep you on track.
  • Step 4: Actually Plan!
    • You have your long-term and short-term goals, activities you love to keep you motivated, and are prepared for obstacles. Now, you need to actually plan when you are implementing your new routine. If your schedule allows, workout at the same time everyday so that time of day becomes a cue.
    • Plan your week out. Pack or set out your workout clothes the night before. Plan out classes you will take. Figure out what you are doing each day to avoid the excuse of not knowing what to do.
    • Use the buddy system. Having someone waiting for you is more motivation to get to the gym and complete your workout. Whether it’s a friend or personal trainer, have someone help you stay accountable. It’s a lot harder to say “naw, I’m too tired. I don’t think I am going to make it today” when someone is already there waiting for you.

If you have any questions on this topic, please feel free to contact me at mrausch@healthworksfitness.com or comment below!

Workout Music Tips

by Molly Rausch, MS ATC, CPT

Hello everyone! This week’s “Fitness Tip of the Week” is about picking the right music for your workouts.

Music

It makes up such a powerful part of us. All you have to do is watch a movie to realize the important effect music has on your mood. The suspense in a horror movie, the love in romance, and the happiness in a comedy are all enhanced because of music. There has been a lot of research on the connection between music and mood. It has studied the connection in both general circumstance and specific environments. Physical performance and music is one of those specific environments studied often.

The research between exercise and music has covered different tempos, performance, mood, etc. Through this research, we have found that high-tempo music does, in fact, enhance exercise performance and endurance. It is no wonder it’s hard to spot a person at the gym or running outside who doesn’t have headphones in while they are workout out. Most gyms play music nonstop over a sound system for those who don’t use headphones. Group classes, like Zumba, specifically design the workout to music to keep you going strong. Music helps you enjoy your workout more, feel better while you exercise, and help you push harder and recovery more effectively.

Really, the biggest problem with music and exercise is picking the right mix for your workout.

How to Decide

The best way to decide what music to put on your workout playlist is by matching the music tempo (or speed) to the intensity of your workout. This is especially important for women, because research has found that we exercise to the beat of our music. On the more technical side, cnet put out a great article breaking down ideal beats per minute (BPM) for different types of exercise. Low intensity exercise, like yoga or Pilates, should have music with 60 to 90 BPM. Steady-state exercise should have music between 120 and 140 BPM. Music for your high-intensity workouts should have 140 to 180 or more BPM. If you are like myself and less musically technical, here are some good tips to help you pair your music and workout:

  • Bookend your workout. Figure out a couple great songs that aren’t too intense and makes you happy to start off your playlist to get you pumped for the workout while you are warming up. Then, find feel-good, slower songs to put at the end of your playlist for your cool down. Figuring out your starting and ending points will make the flow in between much easier.
  • Spice it up. Add a good mix of genres you like to keep your playlist from feeling stale. You don’t want an hour of the same old sound in your ear. Throw in a mix of fast paced, throwbacks, pop hits, and motivational songs to keep you focused.
  • Use other resources. Work smarter, not harder. If you don’t have a preference on music, use already made playlists. Spotify, Fit Radio, and Apple Music are just a few of the places you can find workout playlists for different workouts.

Thank you for reading! If you have any questions of this week’s tip, feel free to email me at mrausch@healthworksfitness.com or leave a comment below!

Water Workouts

by Molly Rausch Certified Personal Trainer and Certified Athletic Trainer

Hello everyone! This week’s “Fitness Tip of the Week” is about working out in the water! The summer heat is upon us, sending many of us poolside or to the beach. A water workout is a great way to stay cool in the heat and also provides a great, low impact workout option.

Before we get into tips on how to get a great workout in without just swimming laps, I want to remind everyone of two major things. First, water safety is so important! If you are not a strong swimmer, in open water, or just in a pool, please be safe! Second, remember to stay hydrated! Lots of people forget to drink water while in the pool because you don’t feel hot or feel yourself sweating. You still need to replenish liquids like any other workout.

Tips on Your Water Workout:

A lot of our workouts involve impact heavy activities. Cross training from running with a bike or elliptical workout is a great supplement, but we shouldn’t forget about our water option to reduce impact stress. Water workouts give our joints a break, provide both endurance and high intensity options, and really help improve our lung capacity. So besides just swimming laps in a pool, what are some other ways to get that heart rate up? Well, here are some suggestions to help you!

Do as many repetitions in 1 minute of an exercise before moving to the next exercise. Complete all six exercises before repeating the set. Complete 5 full rounds!

This image has an empty alt attribute; its file name is GF-mbNBMDF1-eHdUSWUYZc5TghOm7wjaNWM4DtzKI125WTnRxrIa15J22ON0BxRbo9-MpXnK0lFmckxZby_-5SzboAhDimHmjrkGJ-jfhtzJcU8qcmQrmWSkeG1vGKlYGmxgOkF5
Squat Jumps
This image has an empty alt attribute; its file name is bu7txuFI6weyh_BWwzl6vz7VbsvtL7BAxAno3FXZ0t1Y9fX1rDcIKaKVHJ_i_o0UYjqGiM5pkNpw3xilx5CMhWNCHVw1OZ67haJuki-Z5rLOjrLICcjt5ZNyr_3LLzA3qoFoVy1f
Water Jogging
This image has an empty alt attribute; its file name is qB8ulXo0BCc2jZ8IDgf6kKB07lMlP0-DqT7eSjPazQk1LbT0pRFV1lZ2QoLvo7pj-odqZbvivzx6bq92aACh-1sHImv12IsBCxW_c4qDAmYzSFxpU189TY_dAyqQiAqd5UBYU5fp
Towel Skiing
This image has an empty alt attribute; its file name is mfM4knpXznv65Qn6-W8s9c7z4q3Hp824PYPcszv064iV8K1udHkDKhEK6j_mTDgFdwG45P-OGvONTKIe1gMM34ZKR3nY0BH5ygQvdpc5bcI3t2LDAM3IB6i6qUXligr0JgilXBdW
Press Ups
This image has an empty alt attribute; its file name is gw1A3RgAuBBYzKC1dsWjkbMTBlW6cLjFIUdCGU7PIv0pScOxRM7hkK9Sc18QWyjYJY2MiD_c65fAbYlx4mDhZZrAHJB_lrKaCxh3pnhhmgCXqy0bz5sS7WK7Pu46DAVxXfF28dbJ
Stationary Kicks
This image has an empty alt attribute; its file name is f81pWD9ERvEdPrvfvYgRordKyvG9fT3mwLIiQFTIweT-fXHOEa3Fnh6yr5I_WykZATHZ1s9L5k-9gsVO43tru3kyi3eyA6pJWPk8bcsssg7rnBTpaCZPuEjy5mazQ2oFukFZ5Y4s
Pool Crunches

If you have any questions on this topic, please feel free to contact me at mrausch@healthworksfitness.com or comment below!

Resistance Bands

by Molly Rausch Certified Athletic Trainer and Certified Personal Trainer

Hello everyone! This week’s “Fitness Tip of the Week” is about using the resistance bands. I am sure most of you have seen these, used these, and formed opinions about them. I will admit that they can be a pain to put on and keep from rolling, but the benefits of training with resistance bands greatly outweighs the hassle of getting them on. For those new to resistance bands, the color and thickness of the bands determines how much resistance they have. The different shapes of the different bands make it easier to do certain exercises. Whether you have experience using them or not, I am going to let you know why everyone should be using them! Warning: the following is going to sound like a “too good to be true” scenario, but they honestly are great.

To start, bands are a very cost effective way to strength train. You can get a set of four bands with different resistances for under $10 dollars. They are easy to travel with, meaning less excuses not to get a workout in, regardless of where you are in the world. Bands provide a different type of resistance that you can’t get from lifting weights. Regular weight lifting strengthens the body through a constant resistance. It doesn’t matter what place in your range-of-motion you are in, the resistance is the same. With bands, you get a progressive resistance. This means that as the band stretches, you are met with more resistance. It also means that you need more control to bring the band back to an unstretched position.

Progressive Resistance: 

Because of the progressive resistance bands provide, they are a great piece of equipment for everyone from seasoned weightlifters to the injured and recovering. They help improve your muscle strength and control through your whole range-of-motion. The more strength you gain through your entire range-of-motion, the more stability you will have. The more control and stability, the less likely an injury is from happening. Injuries happen when the weakest link in the chain breaks. Bands help keep all the links in the chains the same strength.

Full Body Workout Idea: 

For a great 30-minute band workout, I like to cycle through these 5 exercises as many times as I can. Resistance should be strong enough so the exercise gets challenging around the 7th or 8th repetition.

If you have any questions on this topic, please feel free to contact me at mrausch@healthworksfitness.com or comment below!

Outdoor Exercising Tips

Zion National Park (Jan 2019)

by Molly Rausch Certified Personal Trainer and Certified Athletic Trainer

Hello everyone! This week’s “Fitness Tip of the Week” is about exercising outside! This week of warmer weather has me longing for fresh air and the great outdoors. I know a lot of us would like nothing more than to move our indoor fitness workouts outside. During this pandemic; however, there becomes a conflict between being safe indoors versus trying to stay safe while outdoors. With states and countries starting to reopen, it’s important to keep a balance between protecting ourselves and maintaining a healthy mental status. Our new normal includes preparing for all the usual outdoor elements (i.e. weather, pollen, etc) along with pandemic protective measures.

COVID Related Outdoor Tips:

The most important step before heading outside is to follow COVID safety recommendations. Keep up-to-date with your area’s restrictions and follow them. The CDC and WHO also update their guidelines as more information becomes available, so it’s important to stay informed and keep checking for updates. The following list of tips is not a complete list and things are changing quickly, so keep checking with your local and state authorities for updates on what you should be doing. So, here are some tips:

  • Wellness Check: whether we are having pandemics, flu season, or living in an alternate universe where COVID doesn’t exist, it is always important to stay home if you aren’t feeling well. The body heals quicker and less people get sick as a result if you just stay home when you are ill.
  • Maintain Distance: if you are going outside for your workouts, remember to maintain distance and stay at least 6 feet away from others. If you have a normal running route or hiking trail but it’s usually busy, pick a different area or time to reduce contact with others.
  • Mask Wearing: the mask is there to protect you from others and others from you. It can only do that if you are wearing it and wearing it correctly.
  • Surfaces Touched: be mindful of what you touch while you are out. Elevator buttons, door handles, and cross walk buttons are all things you may touch to get out and go for a run. Don’t touch your face and wash your hand when you get back.
  • Avoid public restrooms: sometimes it is unavoidable, but reduce your risk of exposure by reducing the use.

Tips for Exercising Outside:

COVID-19 precautions are not the only thing you need to also be mindful of. The weather plays a huge part Below is a list of some of the considerations to keep in mind when exercises outside and tips to help plan a successful workout: 

  • Time of day: the hottest part of the day is between 11 am and 3 pm. If possible, avoid working out during these times. Early mornings are a great time to get that workout in. 
  • Clothing: wear breathable, light colored clothing. Dark colors absorb sunlight, making you warmer. Make sure it’s breathable both in fabric type and fit. Tight clothes make it harder for your body to cool itself. 
  • Sunscreen: protect your skin! 
  • Hydration: there are so many things I could say about hydration. The warmer it is, the more you sweat, resulting in an increased need to hydrate. Don’t wait to hydrate until you feel thirsty. Stay on top of it early.
  • Electrolyte replacement: sweat is composed of both water and salt. You need to also replace your electrolytes to maintain homeostasis in your body. Replace what you lose!
  • Shade: when possible workout in the shade. It helps you stay cooler and get more from your workout. 
  • Forecast: keep an eye on the weather. Knowing what the temperature and humidity is can help you plan your workout for the day. Storms can also come in quickly, so knowing what’s predicted can help you stay safe. 
  • Body awareness: listening to your body can help you be successful with your workout and stay safe. Heat exhaustion or heat stroke can happen quickly, turning a fun, outdoor workout into a medical emergency. It’s okay to take more breaks for rest or hydrating if that’s what your body is telling you. 
  • Altitude: for those hikers out there, don’t forget the changes in oxygen levels, temperature, and wind speeds as you reach higher elevations.
  • Pollen: itchy eyes, sneezing, and difficulty breathing can all happen because of pollen in the air. If you have seasonal allergies, plan ahead and adjust as needed. With COVID, be extra careful to know your symptoms are indeed from allergies, because you don’t want to assume and get a lot of other people very sick.

If you have any questions on this topic, please feel free to contact me at mrausch@healthworksfitness.com or comment below!

Exercise Ball Workout Tips

by Molly Rausch Certified Athletic Trainer and Certified Personal Trainer

Hello everyone! This week’s “Fitness Tip of the Week” is about using an exercise ball. This piece of exercise equipment goes by many names. Depending on why you are using it, it can be called a physioball, Swiss ball, or just generally an exercise ball. Each name hints at its diverse usefulness. From an ergonomic aspect, it can help improve posture and increase core involvement more than just sitting in a chair. From a rehabilitation or fitness aspect, it is great for stability strength improvements from the upper body to the lower body and everywhere in between. This week’s tip will help you navigate what ball is best for you and then how to use it!

Tips on Size Selection

The exercise ball is not a one size fits all. The right ball for you is largely dependent on your height. If you are under 5 feet tall, a ball that is 45 cm in diameter is generally the correct size. When you are between 4’11” and 5’4″, a ball with a diameter of 55 cm is generally correct. People with a height between 5’4″ and 5’11” should have a ball with a diameter of 65 cm. If you are 6 feet or taller, a 75 cm diameter ball is the size for you. The best way to know it’s the correct size is with the sit test. If you sit on the ball and your thighs are parallel with the ground, your knees are at a 90 degree angle, and feet are flat on the floor, the ball is the perfect size.

stability ball size chart - Kinna

Tips on Getting a Full Body Workout

You have a ball that is the perfect size for you, now it’s time to put it into use! Using just your body weight and the ball, you can get a great workout that helps with core stability and muscle strengthening. Below are six exercises that make up a 30-minute strength workout. Here is what you do:

  • For each exercise, complete as many repetitions as possible in one minute.
  • Rest for 15 sec between each exercise.
  • Perform exercise 1 through 6 to complete a set.
  • Complete 4 sets!
1. Wall Squats
Pin on The Exercise Library

2. Elevated Pushups
How To Do Stability Ball Push-Up
3. Deadbugs
The 9 Best Stability Ball Exercises For Core Training | Stability ...
4. Hamstring Curls
Lying Leg Curl Alternative | Hamstring Ball Curl Ins
5. Back Extension
Pin on Lower Back Pain
6. Lunges

How To Do Stability Ball Lunge

If you have any questions on this topic, please feel free to contact me at mrausch@healthworksfitness.com or comment below!

Staying Active while Seated

by Molly Rausch Certified Personal Trainer and Certified Athletic Trainer

Hello everyone! This week’s “Fitness Tip of the Week” is about staying active at your desk! We all know the importance of exercise and living a healthy lifestyle, yet many of us spend a majority of our days being inactive. Long days sitting for class or working at our desks increase the amount we sit more than ever before. On average, it has been reported that people sit almost 12 hours a day! Although exercising regularly helps, it can’t undo the effects of all that sitting. Our bodies are made to move, which is why physical inactivity causes serious health issues. Long periods of inactivity causes your metabolism to slow down leaving you feeling tired and makes it harder to burn off calories. Sitting is also the hardest position for your back to be in. Now, all this doesn’t mean you need to be doing an intense workout multiple times a day, but little things make a big difference.

Tips on Getting Active While Working from Home

Remember, little things throughout your day can make a huge difference. I know it’s not always possible, but try these times as often as you are able:

  1. Get up and walk around every 30 minutes
    • You don’t have to go for long walk or anything. It’s breaking up the periods of sitting that is important! Get up, move around, refocus. That’s all you need to do.
  2. Take the stairs
    • If you live in an apartment building or multilevel house, use those stairs to move more. You can use the stairs during your break to up the intensity before settling back at your desk.
  3. Don’t get lunch at your desk
    • Tons of people are guilty of eating lunch/meals at their desk to get a little more work done. Breaking up your day a little to walk during lunch and/or bring it to a different location helps break up that sitting time a little bit more

Exercise to do at your desk

If you are really in a bind and are unable to get up and move more throughout your day, try a few of these exercises to get your body moving more frequently:

  1. Stretch at your desk
    • There are a ton of chair yoga stretches that can easily be done at your desk. Doing spinal twists, pigeon stretch, chest and neck stretches, forward bend are all great ways to move a little without leaving your desk
  2. Sit on an exercise ball
    • It can help with posture and engages your core more throughout the day. Stability exercises like bird dogs, back extensions, or bridges can then be done on that ball when you need a break from sitting. Just remember: no slouching!
  3. Move those legs
    • Straight leg raises, toe towel crunches, and flutter kicks are all ways to get your legs moving without even standing up. Be creative and move those legs.

If you have any questions on this topic, please feel free to contact me at mrausch@healthworksfitness.com or comment below!

Positive Workout Mindset

large-body-mind-spirit LUX -

by Molly Rausch L1 Certified Personal Trainer and Certified Athletic Trainer

Hello everyone! This week’s “Fitness Tip of the Week” is about how to create a positive workout mindset. When many of us think about fitness, phrases like “feel the burn” or “no pain, no gain” spring to mind. We learn all of these descriptors to fitness that lean toward a more negative connotation. Fitness is all about mindset, so when we use negative descriptors it starts the whole process off on the wrong foot. So how do we flip the script? How do you channel those positive vibes when thinking about fitness?

Spin It

The reality of working out is that you stress the body to make improvements and that can be uncomfortable. Being out of your comfort zone is, well, uncomfortable after all. The cycle we need to try and change is that being uncomfortable isn’t bad. We need to spin it around. Instead of viewing the discomfort of fitness at surface level, we need to remind ourselves of what those sensations really mean. When we exercises, we are making the body stronger, improving sleep, elevating our mood, and helping brain function. I know it’s easier said than done, but focusing on these positive aspects really help change the whole mindset you have to fitness. You have to really buy in though.

There has been a lot of research studies on the power of thought and visualization. Changing your mindset about fitness from negative to positive is a lot about visualization. If you are a person that has a tough time stopping the negative thought cycle about fitness, there are a couple tools that can help spin it to the positive. One tool is creating a reward system. When you complete a workout, do something afterward that makes you happy. Think Pavlov. If you do this consistently, you will begin to associate fitness with happiness, thus creating a positive mindset. A similar tool to incorporate is through correction. If you are thinking about your workout or in the middle of your workout and find yourself in a negative thought cycle, correct the mindset by thinking of three to five positive things about it. Eventually, there will be fewer negative thoughts and they will be replaced with positive ones.

Now what?

Learning to spin it is all well and good, but the most successful tip I can give you about changing to a positive mindset is finding your “why.” WHY? Why did you set the fitness goals you did? What is your driving force? What do you really want to accomplish through working out? You are going to be much more successful if you know why you are working toward a specific fitness goal. It’s like saving money. If you have a concrete reason for why you are saving money (i.e. a down payment on a house, paying off a loan, etc), you are more likely to save and not spend. It’s the same with fitness goals. If you find your why, it’s a lot easier to be positive about fitness. Having certainty as to why you are making yourself uncomfortable makes it a lot easier to be successful in your journey.

If you have any questions on this topic, please feel free to contact me at mrausch@healthworksfitness.com or leave a comment below!

Proper Foot Mechanics

by Molly Rausch L1 Personal Trainer and Certified Athletic Trainer

Hello everyone! This week’s “Fitness Tip of the Week” is about proper foot posture and strike. Now that the weather is nice, people are strapping on those running shoes and hitting the pavement. The average person takes about 2,000 steps while walking a mile. That can put a lot of stress throughout your whole body if your first contact point with the ground is not a proper one. 

Your foot and how it strikes the ground determines how the rest of your body moves. Where your foot goes, the knee follows. This, in turn, changes the position of your hips and back. Stress has to go somewhere in your body. If repetitive, incorrect foot strike doesn’t give you foot or ankle pain, it could transfer up and cause issues with your knees, hips, or back. Luckily, there are lots of ways to help improve foot posture ranging from exercises to footwear!

Foot Posture:

There are three basic foot postures: pronation, neutral, and supination. Neutral is considered the proper position for your foot to be in when you hit the ground. Knee, ankle, and foot should all be stacked on top of each other when in a neutral foot posture.

Supination is when you are strike on the outside of your foot. The biggest reason this is not an ideal foot posture is because of the amount of stress it puts on the bone on the outside of your foot. There isn’t as much padding on the outside of your foot compared to the heel or ball of your foot. Less padding and increased stress can lead to stress fractures in the foot.

Pronation is when your arch caves in and causing your foot to collapse inward. This is a very common foot posture, because the arch of your foot is supported by muscle and fascia. Foot strengthening exercises like curling a towel with your toes or picking up marbles all help improve support within your foot. Supportive shoes or arch supports are another method to help improve this posture.  

Tips on Running Foot Strike:

Standing to determine foot posture is step one, seeing how your foot position changes with movement is the next step. Here are some tips to think about when running and how your foot should hit the ground:

  1. Your first contact point should be between the heel of your foot and midfoot. 
  2. You should roll through your foot from the heel to your midfoot and then toe off
  3. Landing flat footed doesn’t absorb impact as efficiently
  4. Striking on your toes puts a lot of stress on the ligaments in your foot, which can lead to ligament injuries. 

If you are unsure what your foot posture is or how your foot strikes the ground during movement, there are a lot of resources to help you (ahem, like me!). Never be afraid to ask a professional to analyze your gait or assess your foot posture to help ensure you have proper footwear, etc!


If you have any questions on this topic, please feel free to contact me at mrausch@healthworksfitness.com or comment below!