Hello everyone! This week’s “Fitness Tip of the Week” is about modifying exercises. The need to modify exercises is nothing that you should ever feel badly about doing. There are many reasons people may need to modify. Sometimes it’s strength or injury related, but other times it can be for flexibility reasons or pregnancy.
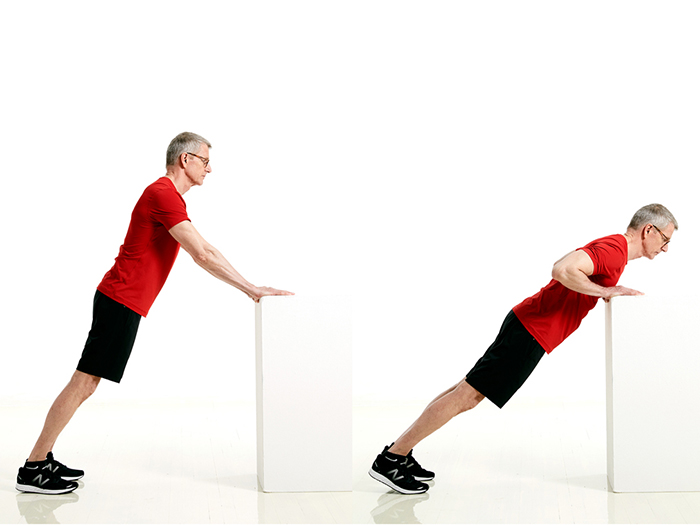
Regardless of the reason behind doing a modification, fitness professionals would prefer them done over doing an exercise with incorrect form. Doing an elevated pushup through your full range of motion is a far better workout then a head-bobbing, tiny elbow bend, pushup attempt. In fact, modifications are used often to help improve the quality of movement. You get strong in one range of motion or difficulty first, then progress to a higher difficulty.
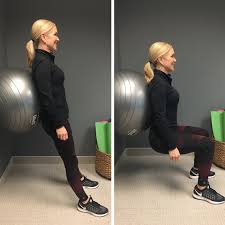
Instead of seeing it as a step back, modifications should be seen as a stepping stone forward toward your end goal. For example, maybe you can’t squat as far down as you want to. Excluding injury limitations, modifying with an assisted squat helps you work through a bigger range. You get stronger and mobility improves, which all helps achieve a successful, deeper squat. The great thing about fitness is that there is always a way to modify an exercise.
Tips on Modifying Movements:
For this week’s tip, I wanted to show different modifications or variations for five common movement patterns/exercise types. Most exercise programs incorporate some or all of these movement patterns, so knowing how to modify will help you get going and stay on track.
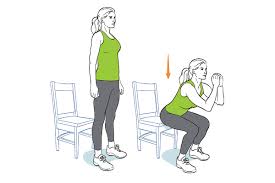
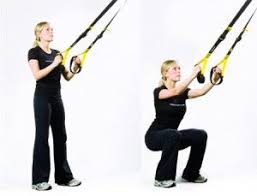
Squat
Hinge
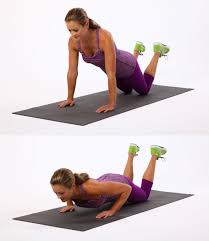
Pushup
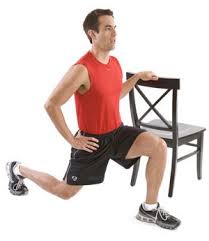
Lunge
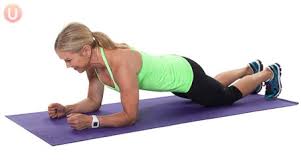
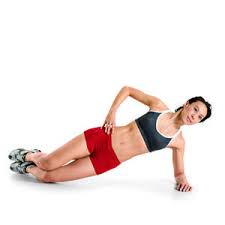
Plank
If you have any questions, please feel free to contact me at mmagunga@healthworksfitness.com or comment below!
Hello Everyone! This week’s “Fitness Tip of the Week” is about strength training. Strength training goes by many different names, including resistance training and weight training. Just as it goes by many names, the structure looks completely different depending on your fitness goals and level of experience. It may not seem like it, but powerlifting competitions, bodyweight workouts, and everything in-between fall under the strength training umbrella. I would never be able to do strength training justice with just one weekly tip. Because of this, I think the best way to introduce this topic is to start with general strength building tips.
General Strength Tips
Everyone should be doing some sort of strength training in whatever exercise program they have. Unless you have a very specific fitness goals, a general strength training program will work for many exercise programs. The following tips will help you get started!
A Proper Warm Up and Cool Down is a Must:
Just like with any type of workout, you need to make sure your muscles are warmed up and ready for the type of stress you will place on them. Going straight into lifting without warming up is just asking for an injury, like a muscle strain.
Cooling down is just as important as warming up. A proper stretch after strength training helps reset your body, improve recovery, and reduce muscle soreness.
Form and Tempo First:
Before you even pick up weights, you want to make sure your form is correct. It is rare that form improves once extra weight is added, so insuring proper form helps protect you from getting hurt.
Your speed of movement is also very important. You want slow and controlled movement to help strengthen the muscles through the entire range of motion. Going too quickly can lead to form breakdown, loss of control, and potential injury.
Breathe!
You need to remember to breath while you lift. Many people find themselves holding their breath while lifting, which will elevate your blood pressure and speed your heart rate up. Some forms of strength training (i.e. Pilates) build breathing into the practice, but for general purposes exhale during the hardest part of the movement and inhale for the other.
Start Light and Gradually Increase:
Many people start too heavy, can only do a few reps, and then are sore for days after a workout. To reduce this likelihood, start with lighter weights you can do 12 to 15 repetitions of the exercise with. The amount of weight should be challenging when you are about 2/3 of the way through the set. This means a set of 12 repetitions should get tough at around rep 8 or 9 of 12.
After a few times of repeating the same workout, gradually increase the amount of weight. You shouldn’t jump up more than 2 pounds with upper body exercises or 5 pounds with lower body exercises. Keep the 2/3 rule in mind when deciding to increase weight so you have a better idea of when and how much to go up.
Train All the Muscle Groups:
Strength training is meant to keep the body balanced during a workout program. You don’t want to create imbalances by always skipping leg day. Make sure you strengthen all the major muscle groups 2 to 3 times per week.
Listen to Your Body:
Give your body rest when it needs it. This includes between sets in a workout and days off between strength training sessions. The rest days between strength training are especially important if you are brand new to lifting. Your muscles are being stressed in a completely different way. They will likely be sore as a result and need more time to recovery before the next lift.
The very last thing you should do is ignore pain. There is a difference between soreness pain and injury pain. If you are having pain while doing an exercise or experience injury pain after, listen to your body and take the necessary steps to heal properly.
If you have any questions, you can email me at mmagunga@healthworksfitness.com or comment below!
Hello Everyone! This week’s “Fitness Tip of the Week” is about running! As a former cross country runner, fall weather always gets me in the mood for running. To me, there is nothing better than crisp air, dewy grass, and open pavement waiting for you. I grew up running, so it’s a more natural form of cardio to me. Ask me to swim or cycle and my body will be drained in about 2 minutes, but distance running has always been doable. Now that I am older and no where near training shape, I have gotten more experience with the hate part of the running love/hate relationship. Usually, I would only get this glimpse during races or hard training days, but my inconsistent running schedule has let me experience this a little more frequently. I can understand more when people speak of how much they hate running.
Running is hard and uncomfortable when you are starting out. I think the best way I have heard running described has been “running sucks until it doesn’t.” When you are just starting out running, it can be very intimating, overwhelming, and easy to give up, but that’s true with any new workout routine. Runners know running is hard which is why there are so many great running progressions out there for people who want to start running. All you have to do is google “Couch to 5k” and you get progressions everywhere from 4 to 10 weeks. This week, I want to help take away some of that intimidation by providing some great running tips to help you get going and then to help you improve.
Tips to Get Started
Be Patient with Yourself
Pick a running plan, stick with it as best as you can, and enjoy the journey. It takes time to build up to distance running, so acknowledge that and celebrate your small victories along the way.
Get your stride and feet analyzed
With anything, safety is always number one. The biggest potential injury risk is have an incorrect stride and wearing the wrong shoes. Have a professional analyze your running stride to help correct anything before there is even an issue. You also want to have a professional help you get the right running shoes for your foot shape and gait. If you are new to running anyway, why not start out on the right foot (see what I did there?), by having stride correction as your first training goal.
Don’t Run in Old Shoes
Since we are on the topic of shoes, once you get the correct shoes for you, keep track of how many miles you run in them. Each shoe has a point where they start to breakdown and do more harm than good. With running shoes, this is anywhere between 300 and 600 miles. Check online to see what your shoe maker says and stick to it as best you can.
Easy-Light-Smooth
Your first goal in a running program should be for a certain distance or time to get easier first. Once it feels easy, focus on feeling light while you run. When you are feeling light on your feet during that distance or time, focus on being smooth through your movements. This will help ease the run and increase your pace.
Talk during Your Runs
A good test that your running pace isn’t too fast when you are starting out is with the talk test. If you can talk to a friend or recite a poem while you are at that pace, then it’s a good pace for you. If you can hardly catch your breath, let alone talk, slow it down!
Run Facing Traffic
If you are on a road with no sidewalks, run so you can see traffic coming to you. In some states, it’s even the law to do this. You want to see cars approaching, not having one come up behind you. You can’t protect yourself from something you can’t see coming.
Tips to Help You Improve
After you have started running and have hit a good rhythm with your training, you are now in a good place to work on slight changes that can really improve your running. Some programs might have these tips already built in, but, if they don’t, please seriously consider adding them.
Strength Train
You need to keep your muscles strong so they don’t break down while you run. Strong, lean muscles help keep runners running, instead of off their feet and injured.
Run Hills and Sprints
It’s good to have one training day a week to do interval training. It helps increase endurance and speed. Most outdoor routes are not perfectly flat, so training with hills will also help you improve. I like training programs that mix intervals between flat surfaces and hills so I get a nice, balanced program.
Recovery and Refuel
Please make sure you stretch and refuel after runs. Your body just worked very hard, so show it some love and stretch those muscles and eat a well, balanced meal to replace what has been depleted.
Proper running attire
The best advice I have heard about dressing for a run is to dress like it’s 10 degrees warmer. You will feel perfect by mid run. Lots of people overdress and are roasting part way through. The exception to this would be if you are expecting extreme temperature changes, then layers will be your best friend.
Map your runs
When you start out, running for time is a great plan. After you have done that a while, mapping your run to see how far you run in a timeframe is a great way to track progress. Ideally, you would be able to cover more distance in a given time the more you train.
If you have any questions, you can contact me at mmagunga@healthworksfitness.com or comment below!
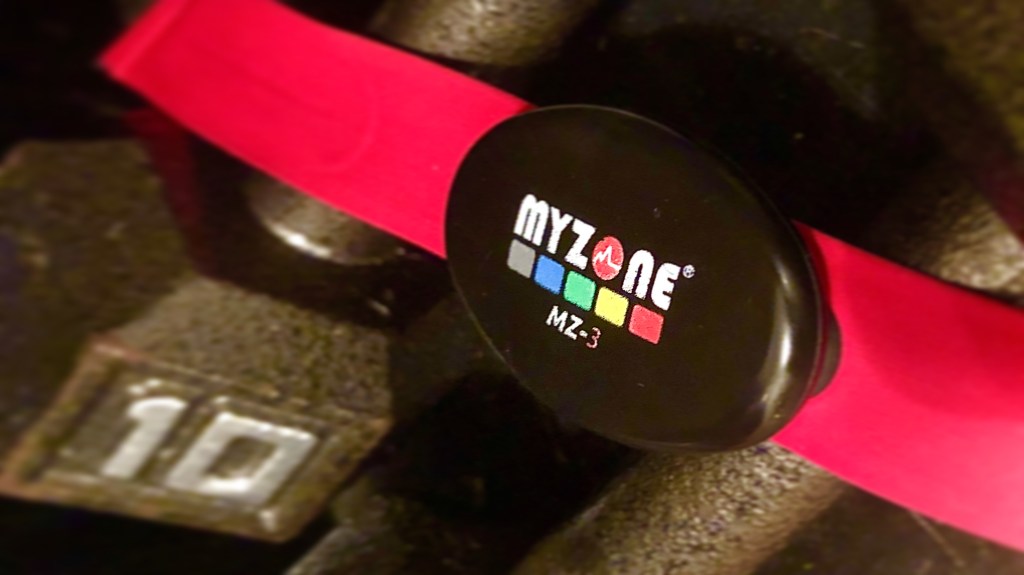
Hello everyone! This week’s “Fitness Tip of the Week” is about what MyZone is and how to get the most out of your belt. With all the changes and incorporation of MyZone in the clubs from group fitness to personal workouts, knowing how to use this piece of equipment is even more important. The MyZone is a smart heart monitor you wear around your waist right below your chest or sports bra strap. What makes it smart? Well, it connects to your phone via Bluetooth and, the more you wear it, the more it adjusts to you. It records your lowest heart rate as your resting heart rate. To find your max heart rate, the MyZone app uses an equation and your age to predict a maximum heart rate. If your heart rises above your predicted max heart rate and you keep it there for 45 seconds, your MyZone belt will raise your max heart rate. This ensures your zones remain accurate.
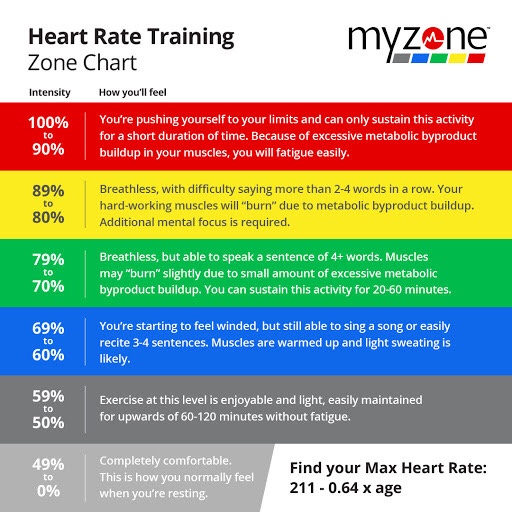
Myzone channels your competitive side but giving you efforts points for minutes spent in different zones. The light grey zone is anything lower than 50% of your max heart rate and doesn’t give you any points. Dark grey, 50-59% of max heart rate, gives you 1 point for each minute. Blue zone gives you 2 points and is 60-69% of your max heart rate. Green is the next zone. It’s worth 3 points and is 70-79%. Yellow (80-89%) and red (90-100%) both give you 4 points per minute. The reason the yellow and red zone are the same is because these are both zones you can’t maintain for long periods of time. The goal is to reach 1300 my effort points (MEP) in a month. The more months in a row you accomplish this, the higher metals you get. Fun fact: if you get 1300 effort points every month for FOUR years, you are awarded the “Hall of Fame” metal.
Tips for getting the most out of your MyZone:
One of the key tips when using your MyZone belt, is knowing what your training session goal is. Your heart rate response changes as your activity changes. A strength training session is not going to be a high MEP session. Strength-based workouts should be a majority in the blue or green zones. These workouts are more physically exhausting, but not necessarily high heart rate inducing. Cardio based workouts, on the other hand, do get you those higher heart rates. Know what your training session is meant to accomplish and let the MyZone help you stay on target.
The second tip is that the 1300 MEPs is set at that number for a reason. The American Heart Association recommends 150 minutes of moderate activity every week for heart health. Doing the math for how many MEPs moderate activity gives you to follow the healthy heart guidelines, you will reach around 1300 MEPs every month.
The last tip is knowing your body. I mean two things specifically when I say this. The first is to pay attention to how hard the activity feels to see if the MyZone belt is accurate. If your MyZone is chilling in the red zone but you feel like you’re strolling along, the belt may need to be adjusted to match you. If you feel like you are pushing as hard as you can, but it never gets above green, the belt may need to be adjusted. Be in tune with your body.
The second part of knowing you body is knowing it adapts. Routines are great, but training the body the same way for weeks won’t help you progress. You need to keep pushing or stressing the body for it to continue to adapt. MyZone can be a good first indicator that a plateau may be happening, if you see that heart rate coast along. If it’s hard to hit the higher zones you should be with a particular workout, it may be time to change it up. Even a week of shaking things up may be enough to get over this bump and continue progression toward your goals.
If you have any questions on this topic, please feel free to contact me at mrausch@healthworksfitness.com or comment below!
Hello everyone! This week’s “Fitness Tip of the Week” is about how to get up for your morning workouts. With summer vacation over and school starting up, it may be hard to fit those afternoon or evening workouts in. Many of us may have to switch to early morning workouts again to ensure we get our workout in. The darker and colder it gets, the harder it is going to be to get out of bed and workout.
A couple months ago, my weekly tip was on how to implement a new fitness routine. Specifically, I mentioned how habit building creates successful changes to fitness goals. To refresh, research shows that it takes at least 60 days to make a new habit. Habits take time, but if you stick with them success follows. For those of us that need to get our workouts in first thing in the morning, we need to start now to ensure we develop the new habit by winter. Now is the time to implement techniques for rising early, before the weather changes, schedules fill up, and motivations waiver. Luckily, there are plenty of tips out there to help us stop hitting that snooze button and get to the gym.
Tips For Becoming an Early Riser:
Get Enough Sleep: Along with developing early morning wake up habits, you need to also get in the habit of sleeping early. It’s easier to get up early when you have had enough sleep. I know it’s not always completely controllable, but adults should get no less than 7 hours of sleep. So do the math and get the necessary z’s.
Be Prepared: Set your workout clothes out the night before, then all you need to worry about in the morning is putting them on. Being prepared gives you a little more sleep and makes you less likely to skip the workout.
Put the Alarm out of Reach: You can’t hit snooze if you can’t reach the alarm. Move it just far enough that you have to get up to turn it off.
Set your coffee maker timer: I don’t know about you, but I NEED my morning coffee. Even if I am waking up for a workout, knowing I have a little bit of coffee brewed and waiting for me is a little more motivation to get out of bed.
Let the light shine in: I know this one gets harder to implement as the days get shorter, but sunlight plays a big role is our sleep cycle. Use the sun while you can to help get you up and out of bed.
Stop and Smell the Peppermint Oil: If coffee isn’t enough of a motivator, smelling a little peppermint oil could help increase your alertness. Once your alarm goes off, applying a lotion or something with peppermint oil may be enough to wake you up and get you moving.
Success in number: you are more likely to get out of bed and do your workout if you have someone waiting for you. A workout buddy, group fitness class, teamTRAIN, or personal training session are all tools to help you if you need a little external force to help keep you accountable and awake.
Take the First Step: the hardest, but most important step to getting up for your workout is actually taking that first step out of bed. Whatever tools help you do this, use them to accomplish this task. YOU CAN DO IT!
If you have any questions on this topic, please feel free to contact me at mrausch@healthworksfitness.com or comment below!
Hello everyone! This week’s “Fitness Tip of the Week” is the final part of our two part series on the hips. Last week, we talked about the importance of hip mobility and tips for improving it. This week covers why hip stability is so important.
As much as I stressed the importance of hip mobility, hip stability is just as important. Mobility and stability really go hand-in-hand when it comes to moving in a functional matter. You can’t move well through an entire range-of-motion if you don’t have the strength to do so. The more mobility you have, the more stability you need. As a recap from last week, what happens at your hips translates to the rest of the body. Weakness or lack of stability can effect the same body regions low mobility does. Weak hips can lead to issues up and down the kinetic chain. The hips are the base of your core. Without stability in your hips, the core becomes weaker and that leads to issues with your back. Poor stability at your hips also leads to poor control at the knees. If you find it hard to keep your knees from collapsing together when you squat or lunge, it could be because your hips aren’t able to stabilize your lower extremities through that movement.
Tips to Strengthen the Hips:
Keeping up with hip stability is critical, especially for those who spend a majority of their days sitting or with generally tight hips. Where you have tight muscles, you will cause other muscles to weaken. It’s a chain reaction with the human body. Keeping the balance is the best way to help keep you working toward your fitness goals as efficiently as possible. To help get you started, below are a few exercises to help improve hip stability. These exercises should be done AFTER you do the exercises to help improve mobility. Stretch everything out, then get it moving. With any stabilization strengthening, more repetitions is the way to go. Ideally, do between 15-20 reps of these exercises.
Band Walks
Clams
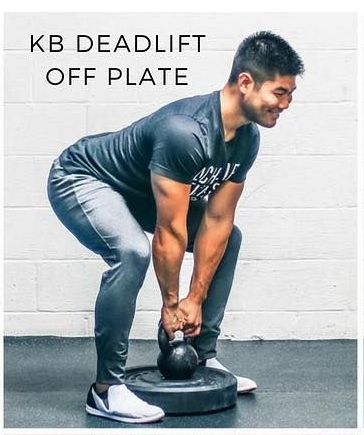
Deadlifts
Banded Marches
4-way Hip
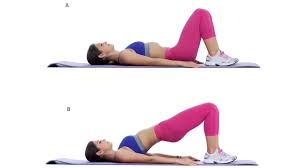
Bridges
If you have any questions on this topic, please feel free to contact me at mrausch@healthworksfitness.com or comment below!
by Molly Rausch, Certified Personal Trainer and Certified Athletic Trainer
Hello everyone! This week’s “Fitness Tip of the Week” is the first of a two part series. Our topic for the next two weeks is going to be about your hips! This week will be focused on improving your hip mobility and next week is about hip strength.
Hip mobility is so important! The hip joint is designed to have multi-directional movement and rotation. If any direction is limited, this creates changes elsewhere in your body to compensate. These other body areas are not designed to do your hip’s job, so it causes breakdown resulting in weakness, pain, and injury. Depending on what motion is restricted at the hips, the compensation problems can be with the knees, back, or both. Tight hips can also cause a whole lot of trouble with core and glute strength, which is our bodies foundation to building full body strength.
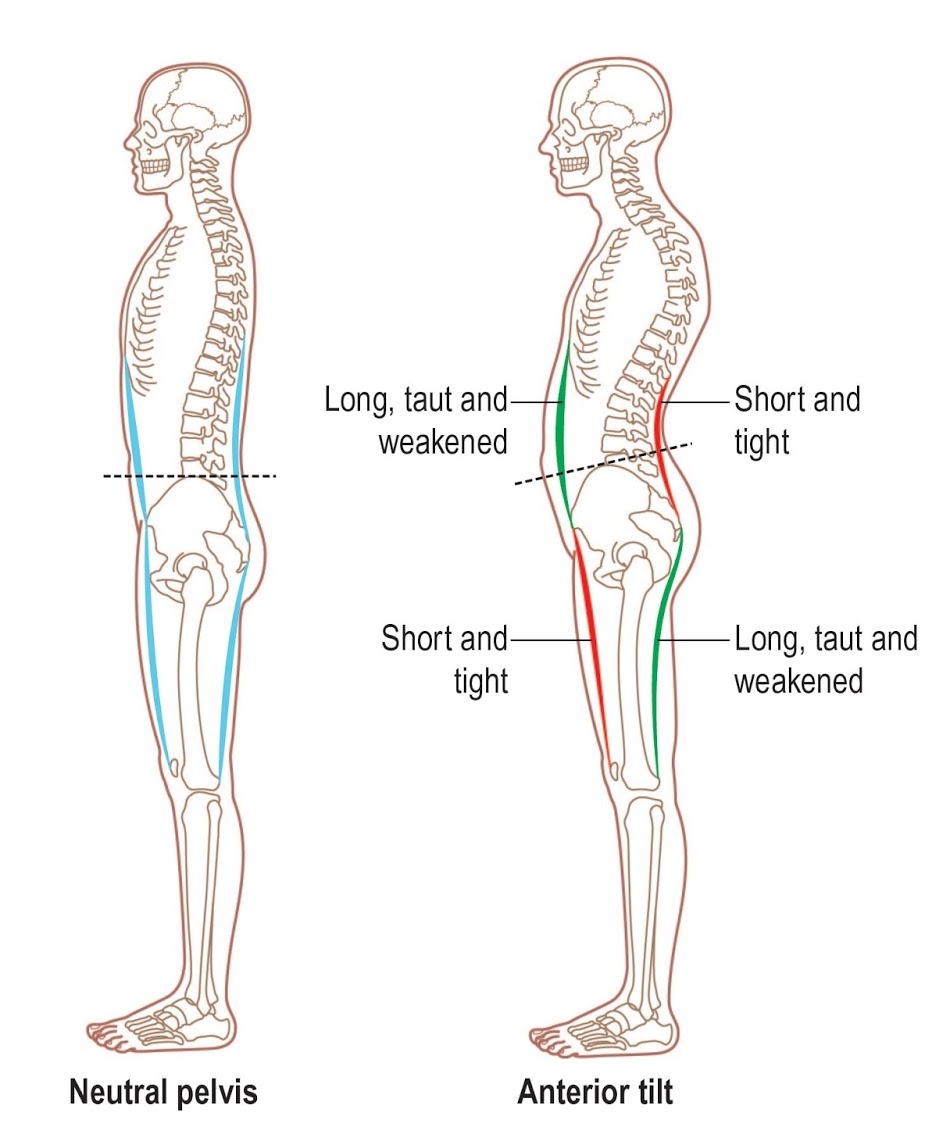
To better help you understand how this happens, this example might help. When you sit, the muscles on the front of your hips (known as your hip flexors) are stuck in a shortened or tightened position. When you go to stand, your hip flexor muscles are elongated (stretched). Normally, this wouldn’t cause any issues, because your hip flexor muscles wouldn’t stay tight for long thus restoring normal range of motion. If you sit for prolonged periods of time; however, it becomes harder for your hip flexors to adjust. When the hip flexors become tight and stay tight, they pull on your lower back and cause your whole hip complex to tilt forward. This is know as an anterior pelvic tilt. Your hamstrings then become stretched, because they attach to the opposite side your hip complex. All these imbalances can cause lower back pain, weak core muscles, and movement limitations.
Tips to Stretch those Hips:
Tightness around your hips can be caused by a lot of different muscle groups, not just your hip flexors. You need to give them all some TLC to make ensure good hip mobility. Hip flexors, groin muscles, IT Band, and glutes are a few of the big muscles to focus on. Below are some examples of great hip mobility exercises to help you get started.
Couch Stretch: -Keep core engaged, push hips forward -Hold 30 sec per side
Quadruped Adductor Rockbacks: -Keep spine straight -10 reps per side
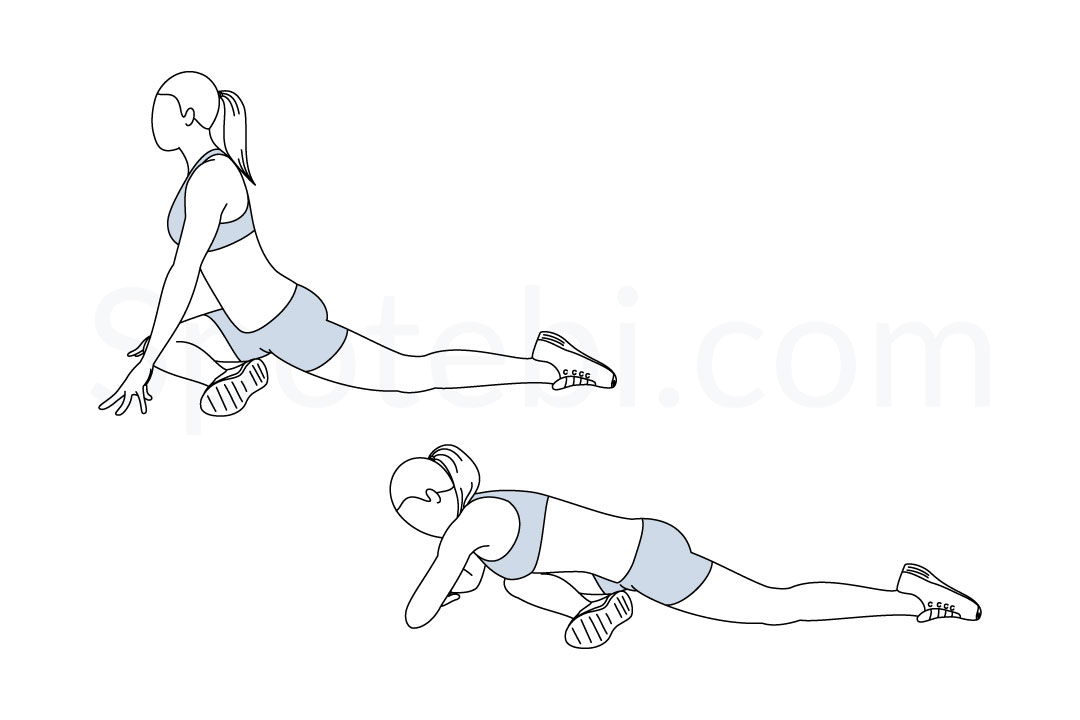
Spiderman Lunge: -Can place knee on ground to modify -Alternate sides, 10 reps each side
Deep Squat Hold: -Feet flat, back straight -Hold 30 sec
Figure 4: -Grab behind uncrossed knee, pull to chest -Hold 30 sec per side
Pigeon Pose: -Keep hips straight, lean forward until stretch felt -Hold 30 sec per side
If you have any questions on this topic, please feel free to contact me at mrausch@healthworksfitness.com or comment below! Thanks for reading!
by Molly Rausch Certified Personal Trainer and Certified Athletic Trainer
Hello everyone! This week’s “Fitness Tip of the Week” is about cross training. Cross training is very wide and highly-variable term. The meaning of cross training is simply the practice of regularly mixing up your routine or doing workouts different than your normal activity or fitness routine. Cross training for a runner would be very different than someone who regularly swims.
There are several benefits to cross training. As a fitness and correct exercise specialist, I believe the biggest benefit to cross training is that it can reduce your risk of injuries. Doing the same physical activity day after day, week after week, can start to lead to breakdown of tissue. If you continue to stress the body the same way all the time, eventually something is going to get worn down and that is what causes injuries. Cross training helps add variety, trains muscles in different ways, and create a balance in the body.
Another great benefit is that cross training helps improve overall fitness and accelerates results. If programmed correctly, cross training should be that missing puzzle piece to your fitness plan. Whatever your body is lacking, cross training should provide that. You get the complete picture and are then able to optimize results.
Tips on Cross Training :
Knowing why you need to cross train provides purpose and, hopefully, motivates you to branch out into different types of workouts. Knowing why is only useful if you also know how to actually do it. In case you are lost as to where to even start, here are a few tips to help guide you in that planning:
Know what you do now
You can’t pick effective ways to cross train, if you don’t know what your current routine looks like. A fitness journal of what you do each week can be very helpful. For example, you may not realize it, but maybe all the classes you pick are strength based. That’s great to do, but to have a well-rounded routine you need that cardio aspect. You can now plan your next week by replacing one or two (depending on how many times per week you workout) strength workouts with a cardio based workout to balance your routine more.
Cross training doesn’t mean work harder
Cross training can include flexibility work as well! Your current plan may have a good balance between cardio and strength workouts already. That’s wonderful! In that case, doing an active recovery day or flexibility training may be your missing piece.
If your normal fitness program involves a majority of high intensity strength and cardio workouts, you 100% need to cross train with flexibility work. A huge part to injury prevention is listening to your body and giving it rest when it needs it. If you workout hard for multiple days in a week, show your body some love and pick a more mind/body workout to break up the intense workouts.
Every single person benefits from flexibility training! This needs to be included in everyone’s workout routine, no matter the intensity or frequency of workouts.
Use your resources
Sometimes it’s hard to see what a plan needs. Seeking help from professionals, like personal trainers, coaches, or fitness professionals, can really take a lot of the guesswork out of cross training.
Think outside the gym
If all your workout days are spent at the gym or inside, then maybe the proper cross training activity is changing the location to outside. Anything from kayaking, rollerblading, golf, or walking can be cross training if you don’t do it often. Remember, the whole purpose of cross training is to add variety.
Don’t forget about proper form
If you do find that the best cross training is something completely new to you, make sure you get guidance on how to do it correctly. If it’s strength training, get your form look at before you load up on weights. If it’s starting to run, make sure you have proper footwear and have your gait analyzed. Cross training is meant to prevent injuries, so add variety properly!
If you have any questions on this topic, please feel free to contact me at mrausch@healthworksfitness.com or comment below!
by Molly Rausch, Certified Personal Trainer and Certified Athletic Trainer
Hello everyone! This week’s “Fitness Tip of the Week” is about the hip hinge. The hip hinge is a movement pattern that involves bending at the hips to flex forward. Unlike the squat; which involves relatively equal knee and hip movement, the hip hinge is a hip dominant move. This is a movement pattern that we natural develop as toddlers as a way of staying balanced while picking items off the floor to avoid back injuries, but as adults lose the ease of the movement. What is the reason for this? Well, a lot of it has to do with sitting so much throughout the day. Our whole posture changes and results in a completely natural movement pattern becoming difficult to perform correctly.
Why is the hip hinge important?
Keeping the body balanced is the key to injury prevention and optimizing performance. Squat and hinge patterns are both very important movements within a strength training program. The squat is a great exercise to strengthen your quadriceps, while the hinge is great for hamstring and glute strength. Most people are already quad dominant, so continuing to only train the squat movement will create more imbalance within your body. This imbalance leads to knee and low back injuries. Creating balance in your lower body is the best way to reduce this injury risk.
Tips on proper hinge form
Perfecting your hinge form first is the critical first step in performing a powerful deadlift or kettlebell swing. If you can’t hinge, you can’t do these exercises effectively. Here are some tips in how to do a correct hinge:
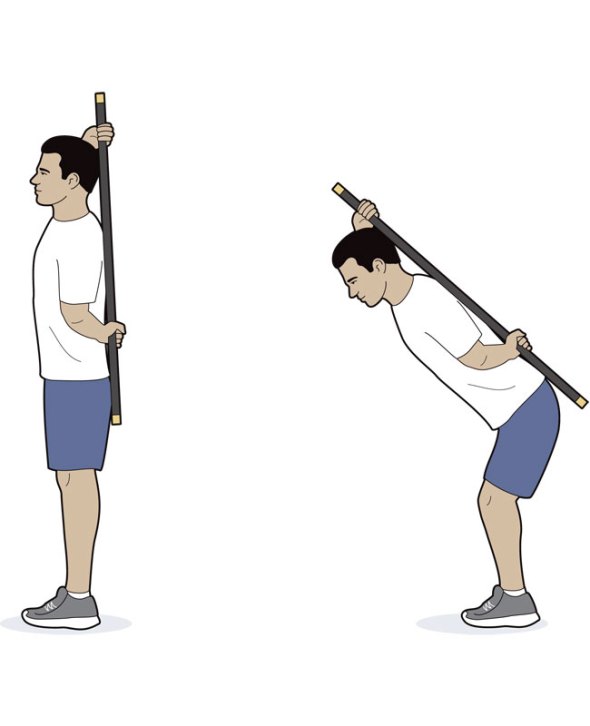
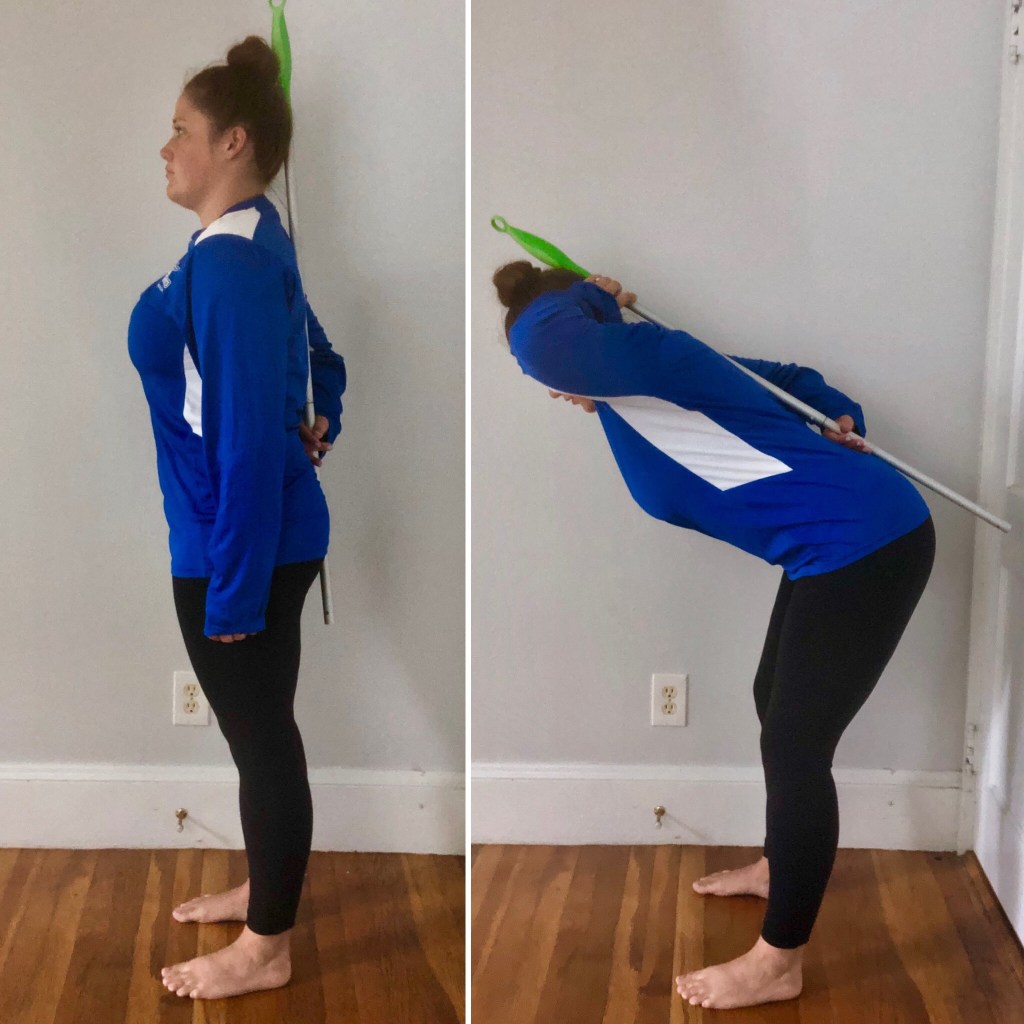
Maintain a neutral spine ○ Start by holding a dowel along your spine. Your head, back, and butt should all be touching the dowel.
Bend at the hips ○ Keeping the three contact points along the dowel, bend forward from your hips. Make sure to have a soft or slight bend in your knees.
Shift weight backwards ○ As you are bending forward, your hips should move backwards. Stand with your back towards a wall, about a foot or so away. As you bend forward, reach your hips back to touch the wall.
Shoulders back ○ Once you remove the dowel, set your shoulder blades back together and away from your ears. This will help with bracing while lifting weights.
Core engaged (always)
If you have any questions on this topic, please feel free to contact me at mrausch@healthworksfitness.com or comment below!
by Molly Rausch Certified Personal Trainer and Certified Athletic Trainer
Hello everyone! This week’s “Fitness Tip of the Week” is about how to get past some of the most common excuses for not exercising. We all join the gym or sign up for an online workout program for different reasons. We come with goals ranging from weight loss to race training. We know the health benefits of exercise. We know why we should exercise. We have plans and tools to help us succeed in reaching our goals.
Unfortunately, knowing is not doing. The hardest part of accomplishing our goals is actually starting our workouts. We come up with tons of reasons why we “can’t” workout on a given day, even when we know the benefits outway any excuse. When we do overcome our excuse and get a workout in, one of the most common responses I hear is “I feel better than when I started.”
How do we get past our excuses and become more successful with our fitness plans?
Tips on beating exercise excuses:
Excuse: “I hate working out.” “I hate cardio.”
Solution: Find an activity you do love and incorporate it in. Find ways to merge things you do enjoy with exercise. It may still be a love/hate relationship, but that’s better than a pure hate relationship.
Excuse: “I don’t have time.”
Solution: Everyone has 24 hours every single day. You have important items you prioritize and ones you tend to put off for another day. Make exercise a priority! A workout doesn’t need to take hours and hours out of your busy day. Split up your time and use it wisely. Do you have a spare half hour two days in a row, but not a full hour? Then split a workout between two days. Week packed, but the weekend pretty relaxed? Do a fun workout to fill your weekend up.
Excuse: “I’m too tired.”
Solution: I know it sounds like a contradiction, but exercise helps increase your energy levels. Our bodies adapt to our environment. If you have a very stationary job, you will feel tired because your body has adapted to that. If you exercise regularly, your body also adapts to that and increase energy levels to accommodate.
Excuse: “I’m too out of shape.” “I am hurt.” “Exercise is too hard.”
Solution: The great thing about exercise is that there are a ton of options. Everyone can find something that helps them and progress from there. You are never too much of anything to not exercise and very few issues rule out exercise completely. If you feel too out of shape for something, know there is a progression for you. If you have an injury and are in a boot, there are a ton of upper body exercises you can do to keep your fitness routine going.
Just remember, no excuse can outweigh the benefits of exercise. It doesn’t mean you need to work out every single day in a week, but you should work out at least once every week.
If you have any questions on this topic, please feel free to contact me at mrausch@healthworksfitness.com or comment below!